Lesson 21: How to Control Image Quality
in5 provides you with powerful controls over the HTML output generated from Adobe InDesign. In this lesson, expert Chad Chelius will show you how to control global and individual image quality settings.
Expert Contributors to this lesson

Chad Chelius
Estimated time for lesson
Today’s lesson should take approximately 10 minutes.
Today's Course Outline
- Image Quality Basics
- Global Image Quality Settings
- How to Set the Quality for Individual Images
- How to Quickly Apply Specific Settings
- Reducing Image File Sizes
Image Quality Basics
Here are some quick basics on web images.
- The standard web resolution is 72 points per inch (ppi).
- Hi-definition (aka Retina) displays have a resolution 2-5 times higher than standard web resolution.
- Typically, 2x resolution (144 ppi) looks crisp on a high definition display.
- JPGs generally do the best job of compressing photographic images with millions of colors.
- PNGs are the only format that supports full transparency.
- PNGs are typically the best "all-purpose" image on the web.
Global Image Quality Settings
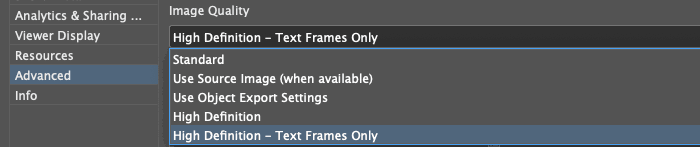
The settings for controlling image quality can be found in the Advanced section of the in5 dialog box (File > Export HTML5 with in5...).
You have 5 choices to choose from in the Image Quality menu.
- Standard – Uses the default in5 settings (typically 72ppi PNGs, 150ppi when using the Liquid Page Format, or JPG is used when the source file is a JPG). When the source image is a GIF and the frame matches the dimensions of the image, then the source image itself is used.
- Use Source Image (when available) – Copies the source image (the one placed in InDesign) directly to the output instead of re-rendering the image. If for some reason the source image is unavailable, a new image is rendered with the default settings.
- Use Object Export Settings – Offers the most customization of image output by using the custom rasterization settings defined in InDesign (see details below). GIF images are converted to PNGs.
- High Definition – Automatically exports all images at 144 ppi.
- High Definition - Text Frames Only – Exports text frames (or anchored object when rendered as HTML) at 144 ppi and uses the standard export for all other items.
InDesign’s Object Export Options settings can provide more individual control of how images are exported using in5.
How to Set the Quality for Individual Images
To control image quality for an individual object in InDesign, choose Object > Object Export Options or right-click on the object and choose Object Export Options from the contextual menu.
In the Object Export Options dialog box, click on the EPUB and HTML button.
In the Preserve Appearance from Layout drop-down menu, you have four choices.
- Default – Uses the Standard setting.
- Use Existing Image for Graphic Objects – Uses the source file of the placed image. Make sure you are using a supported web format when choosing this option.
- Rasterize Container – Rasterizes the entire frame (useful when rasterizing objects, individual text frames, or entire groups) with the settings you choose.
- Rasterize Content – Rasterizes the content with the settings you choose.
When Rasterize Container or Rasterize Content is chosen, several drop-down menus become available providing control for the image format, resolution, and quality of the image.
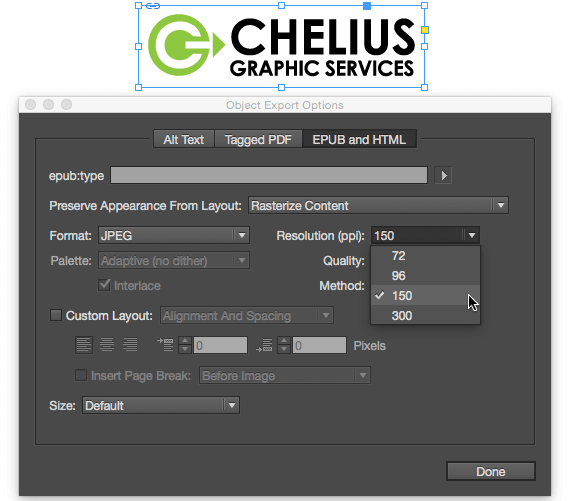
Two additional drop-downs become available (Palette and Method) depending on the image format that you choose in the format drop-down menu.
- Format – InDesign provides JPEG, GIF, and PNG as web format choices.
- Resolution – You have the choice between 300, 150, 96, and 72 ppi resolution.
- Quality – In the case of JPEG, you have the choice of low, medium, high, and maximum quality (the higher the quality, the greater the file size).
Pro tip: When using the Object Export Options dialog box, you can leave this dialog box open while working in InDesign. For example, if you have several images that you need to define properties for, you can keep the dialog box open and click on a different image to define the properties for that image.
If you set up Object Export Options, be sure to choose Use Object Export Settings from the Image Quality menu in the in5 dialog, otherwise global image quality settings will be used.
How to Quickly Apply Specific Settings
One way to quickly and efficiently define properties for objects in a document that require the same settings, is to create an Object Style in InDesign that defines the settings needed for a certain type of object.
For example, you might have object styles for the following image types.
- High-res JPGs
- Low-res JPGs
- Hi-res PNGs, etc
The easiest way to define an Object Style in InDesign is to define the Object Export Options for an object first.
Creating an Object Style with Object Export Options
Within InDesign, select an object on the page and set the Object Export Options that you’d like to define.
With the object still selected, open the Object Styles panel by choosing Window > Styles > Object Styles and with the object selected.
Click the Create New Style button at the bottom of the Object Styles panel.
Pro Tip: Hold down the alt/option key while clicking the Create New Style button brings up the Object Style Options dialog box where you can enter a descriptive name for the style and adjust any properties for the style.
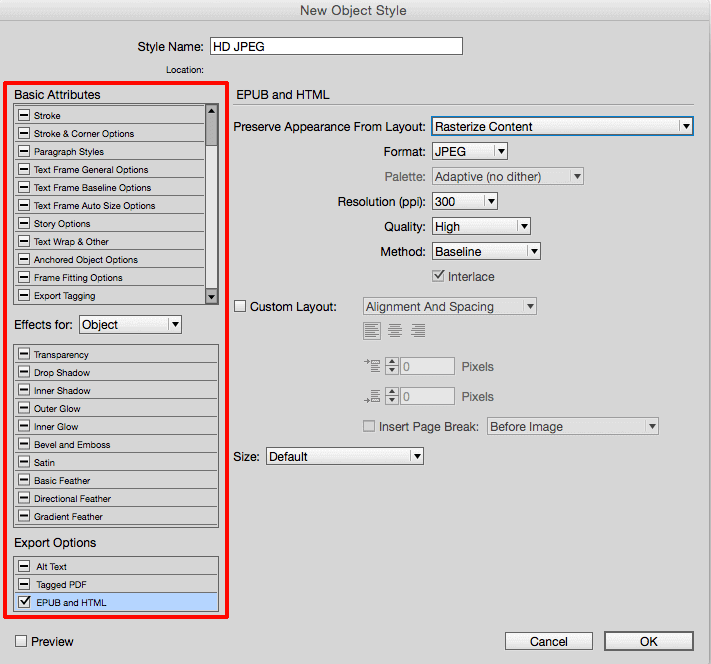
Note how every checkbox for attributes in the image above has a minus sign (-), except the EPUB and HTML options. This means the style will let the object itself control those “pass through” settings. So only the image export settings are applied.
To apply the style to the selected object, make sure that the Apply Style to Selection checkbox is enabled within the dialog and then click OK.
Now you can simply select the objects in your layout that you’d like to render with that style, and it’s one click to apply the Object Style.
Any object that you apply this object style to will have the Object Export Options defined within the style.
If you later decide to adjust the settings for the objects with that style applied, simply edit the style and all images will be updated immediately.
Reducing Image File Sizes
If you have an in5 Pro plan (or higher), you also have access to additional Image Compression in the Advanced section of the in5 dialog the will optimize the file size after export.

When you enable Standard optimization, in5 does advanced compression of the final JPG, PNG, and SVG images, creating much smaller images than what you would get exporting from InDesign, Illustrator, or Photoshop. This results in faster download times for your content.
If you have a Gold plan (or higher), you can use the Enhanced optimization which compresses the files even further and searches for (and consolidates) duplicate images created by InDesign during export.
Take full control of exporting images from InDesign to digital formats
Take Aways
- You can control image quality at a global or individual object level.
- Use Object Export Options to control the export quality individual objects.
- An Object Style can be used to mass apply specific export settings.
- Use Image Optimization with your Pro+ plan to create smaller files.
For more from Chad, check out his website or his video courses on Linkedin Learning.


